Monday, December 21, 2015

Working on the Singer 306k


That has been waiting for me since I bought it early last spring.  I oiled every thing up and plugged it in to see if it worked (the tag from the thrift store said it did not, but we know how that is).  It DID!  And pretty nicely too, except when I went to adjust stitch length with that pretty steel lever bottom right of the machine's neck, that lever snapped right off.  It was set in teeny tiny stitch mode.  It took a while to find another lever, until earlier this month as a matter of fact.  I've had it sitting on a book shelf on my stair landing all these moons. Most days as I walked by I twisted a knob or two, maybe took it for a few threadless stitches, to keep it all free moving and somewhere closer on my to-do list.
I downloaded a service adjuster's manual for a 306w because that's what I found.  Basically the same machine except I couldn't find any light/lamp on the W model.  These vintage manuals can have illustrations that are hard to see, not to mention at times hard to find at all for some of the more obscure machines.  So, I'm offering some illustrations of my repair of the stitch length regulator.  I'm not a pro, yaddi yaddi yaddi. And unplug your machine before starting to take it apart. 


First I had to take off the little numbered plate in front. Actually I didn't have to. That step is to remove the lever that I had already snapped off.  I hoped I would be able to see if my assembly was repairable by looking in there before I took the machine further apart. I really could not.


Next part was down under.  I thought I had cleaned this machine, but I guess I stopped after oiling when that leaver broke.  It will get thoroughly cleaned before it gets put into use.  The eccentric stud (so named by the manual) that the screwdriver is pointing to needs to come out, after loosening the screw just to the left (ingloriously named "C-3").  I did not use the screwdriver seen.  It won't work.  Mr. Rain at the fabulous Vintage Singer Sewing Machine Blog can tell you all about the right screwdrivers and a wealth of other stuff.  I picked up some screwdrivers from Walmart that will work because they are open at 6am. I am sure they are not as nice as the ones he directed readers to.  They do fit the screw slots on the machine well, and  that's the important part. By the way, that stud only unscrews so much, then you have to pull it out. Don't drive yourself crazy.


Then, ta-da, your assy is off from the bottom. There is one more screw however.  The book names it "screw E", ominously warns you not to strip it (Yikes!), and then tells you vaguely that it's behind the motor,  no diagram.  So, you have to flip it around unless you already had it backside up.  And to answer your other question, yes you do have to take the motor off.  Don't worry, this is really really easy.


It's just that one big ole screw there, holding it on by the bracket.  This is where and how to get most external motors off machines and how you get a new belt on too.


 Motor off, and there's screw E. More dirt, dirt, dirt! And look, this Singer was made in Great Britain. For giggles, read up on ole Mr. Singer one day.  Not if you're a churchy lady though. He was a cad, especially for his time.  Was not received in nice homes. Drummed out of the country and off his company's board too. ANYWAY, I found screw E no trouble to remove at all.  It also has much length without threads, so as soon as I could use my fingers to unscrew I did. Then you can feel when to pull it out.


Now you can pull out the stitch regulator assembly, from the bottom. It really was wedged in nicely.  I'm just a little nervous about getting it back in just right in the dark.

But, dammit!!!  The first lever is snapped off too low to pull out and replace with the new one.  I'm going to ask the guys at my friendly auto repair shop if they can ream it out, but I'm thinking I'll have to order the rest of the assembly. At least I know who to order from.  I have an  Ebay dealer named r0npm who told me he has lots of vintage parts machines, and since he had the lever I'll bet he has the assembly it came out of.  He was quick to respond to my inquiry for a part he did not have listed, confirmed with photo that it was what I needed, even offered technical advice.  Shipped it fast and it was less than $10, shipping included.
For today I still have no control of stitch length or reverse either.  I did clean quite a bit of the external crud from the machine as I replaced all of the screws I took out.


This is the light that the 306W apparently doesn't have.  It's in the back of the machine and very sturdily made.  For some reason it reminds me of Army equipment, WWII to cold war post Vietnam era.  I can almost smell a RATT rig.  I had to tinker  a little to figure out how to get it open  to try a new bulb in it.

If you twist it, it will pop off.  Goes back on easy.  That rust looks fresh. Did I get it damp back there?  I'll clean that up too.  Another day. Had to clean up and come to my 6th nightshift in a row.  Next night I'll sleep, which is tonight because it's black as heck past 5am and I gotta go attend to things.

Thursday, December 17, 2015

I don't really like sewing

except for pieces of it.  I like doing free motion quilting or embroidery.  I like making bits and pieces, especially when they come out well, like a good button hole or some very nice pleats.  When I sewed a lot the first time in the mid 80's till the early 90's it was mostly for my kids.  I liked how quickly their little outfits could come out.  I loved how it made me feel like I was honoring my mother's memory, she sewed for all of us and died when my eldest was an infant. Even though it was kind of a grudging hobby, often frustrating and full of feelings of obligation, I threw myself into it the way I do with most interests.  I checked out every library book, watched any programing I could (Sewing with Nancy was pretty much it) and bought more than a few books and magazines.  I practiced and practiced techniques.  I bought every gizmo I could, sometimes waiting years but buying what I could.

This time I was motivated by stuff I started seeing on the internet. There were some fabulous bloggers out there and in particular I was mind blown by the ones sewing for kids, often self drafting patterns.  Wow!  Next came quilts, especially loving the modern trends.  I also love the fashion bloggers although I've only managed to sew myself a first time run for jeans, shorts length because it was just to be a wearable muslin.  I never got up to making the serious pair, though the fit of those short ones is kind of fabulous if I say so myself.  Well, I will, those jeans fit and look great.  Anyway, I can sew, I have a wealth of knowledge, I have the equipment and a pretty good fabric stash too. I suspect I still don't really enjoy it.  I hate how long it takes and how much mess it generates when I have a project in motion.  And I HATE cutting!

However, I really really love how thinking about sewing, reading about it, and occasionally doing it distracts me from bad stuff in my life and the world.  And I love it when I actually complete a project, especially one I'm proud of.  Mostly if I finish one, I'm proud of it.  I get the additional kick now of using machines I either restored or at least oiled and cajoled back to life.  Old honorable work horses that had previous lives in homes where they were probably needed and relied on more than in mine.

Friday, December 4, 2015

work bag is complete


and I'm very pleased with it. It looks very good and I know it's very sturdy.


Seven zippered pockets and the two patch pockets on the sides.  It's just a fraction larger than the original, but way more durable.


Lots of nooks and crannies, but I've been using the same model of bag for four years. I've kept stuff in all the same places so I don't have to rummage anymore.  That's a face mask poking out of  that back pocket and not a naked tampon in case it made you look twice.


One of the best things about this bag is the bright interior.  The original bag was unlined flakey man made stuff.  You couldn't see what was on the bottom, and when you stuck your hand in to feel, you got little black flakes all over your fingers.  Needless to say, your stuff got coated as well. I have been using zippered cases to hold everything in the main part of the bag for a while. I still will, but now if something does get loose in there it won't be disgusting to pull it out.

I shocked myself with how quickly I finished the project, roughly a week. I know lots of people can put something like this together in a day.  I am a slow sewer and easily diverted and sewing without instructions so I was happy with the time it took.  After completion I headed back to the periwinkles.  I had washed and pressed more yardage for the background, and I finally got to try out the shape cut, a ruler by June Taylor.


This is a ruler that has been out there for a little while, and falls into the "I wish I'd bought one sooner" category.  It looked a little small to get a volume of cutting done fast, and slightly flimsy especially for the price tag- around $24. give or take.  I used a 40% discount coupon at one of those big stores that do that discount thing after watching a youtube video on the ruler.  I prefer buying yardage over precuts most of the time, but cutting is not my favorite thing.


By folding the fabric selvedge to selvedge and then once again, you can fit enough under the ruler to get several strips.  Turn the ruler 90 degrees and then you have very fast units- here's 48 in less than a minute.


The cutting is done through slits inside rather than outside edges, the ruler remains stationary for more work so the cuts are more accurate too. The slits are every half inch, if you wanted something ending in 3/8 or 7/8 you would have to use a different ruler or trim down.  This stack was cut in about 3 minutes and will last me a long time. The ruler seems durable enough now that I've tried it out, and it certainly does make cutting any volume of fabric quicker than the one pass and pick it up method.

Thursday, November 26, 2015

Working out kinks on the bag


I was dog-sitting today.  Hiccup sure misses the warmer days with that window open, but he still likes to hang out there and watch for cats, and stray dangerous people.


I've got three of the pockets complete.  I'm lining the largest, simplest in striped mattress ticking, and these two front ones used lining/bias binding in the bumble bee fabric that will line the inside of the bag.  Hard to see, but I did free motion around the embroidery in some metallic thread.  It worked well for the first half of the bag, and then it broke and broke.  I rethreaded, I played with tension.  Could the needle have gotten just a little more dull?  I don't know, I just slogged through it as it's a very subtle effect anyway.


With the zipper in the front flap pocket, I tried it out for size with the cannibalized zipper and found it just toooo big.  I put the original flap on top to compare size and there was quite a difference.  I left a little extra on the pattern for seam allowance, and then allowed more for shrinkage during embroidery/embellishment.  I didn't know how much I'd want to do back while I was cutting, and it's always easy to trim down.


After this step I forgot about the camera and just sewed, so I got quite a bit more done.  I sandwiched this zipper between lining and webbing so I didn't have to fold or finish the edge of the denim when I got there.  I did securely sew it 3 times on the raw edge before doing two lines of stitching through all the layers.  These zippers are NOT pulling out of this bag.  And if I do get a rip or a tear, the fabric is tough enough to take a mend.  My current nylon bag is disintegrating at an alarming rate.  If I don't finish my denim one this week I'll have to carry my stuff in a pillow case!

I am so grateful I've got that 15-91.  It didn't slip through the thickest parts "like butter", but I didn't break a single needle.  I had to slow down, but it went through.  I was trying to hand stitch down some binding tonight and after the third hole in a finger tip I quit and ripped it out.  That's wrangler jean's weight denim, Alice Cooper "they're hard, and feeling mean" jean stuff.  I was considering waxing at least the bottom, but I think it's fine without.

I wish this were my design.  I copied it and then figured out how I could best put it together. I'm enjoying sewing this bag and want to sew some other styles.  I think with a little practice I could start designing my own.  What fun that would be!

Saturday, November 21, 2015

two at a time

well, maybe three projects, if you count the rarely worked on afghan that I carry to work with me every night.  Since that is mostly UFO status I'm only counting the two I am actively working on, the periwinkle quilt and now a new work bag:

 
The job gives us one bag on hire and I usually ask for and receive another each year (though they will let you "buy" them with your special "bucks" you earn for picking up extra shifts).  The bag is designed rather nicely for what we need it for, but the fabrics are cheap and mine starts falling apart in the first 3 months.  By 9 months or so, it's usually pretty shot.


My current one isn't quite this bad yet, but getting there.  I had saved the last 2 previous, thinking I'd use one for a pattern, and that I should get the zippers off the other.  There are quite a few zippers and most of them are in very good condition yet.  I ripped one bag down to be able to trace a pattern most easily from the sections and take any hardware I wanted along the way.  Having the second still together was a bonus for looking at after I had cut out my pieces. It helped me figure out the best sequence to put the new one together.  I also needed one more zipper than just one bag could provide. 


I'm using my new-to-me singer 15-91 and free motioned the embroidery.  So it's not perfect, but obviously personally made, I'm pleased enough with it.  I was tempted to go with more and a little more, but there's a lot more to do with the bag and this is just a prototype.  If it goes well enough I may do another and let myself play more.  Or, before this gets attached to the backside of the pocket it might fall under the darning foot again. The yellow peeping out by the zipper is some home made bias from the same fabric I'm using for lining, some cute bees.  Top stitching is done with some cranberry jeans topstitching thread I got from Taylor Taylor  a while back, and a size 18 needle.

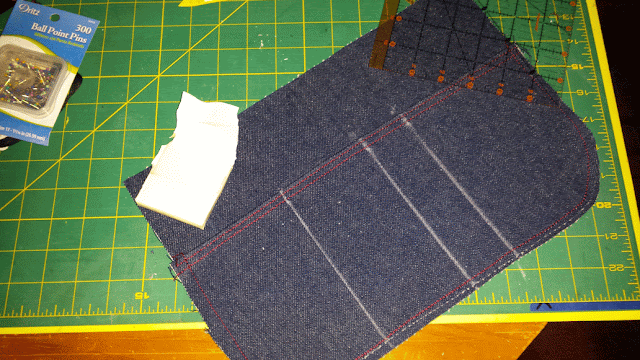
FLASH photography because that's what you use at 2 am.  I was happy to revisit one of my favorite marking tools, soap.  I haven't used it for a while so there wasn't a little sliver in the top sewing drawer and I had to use an unopened hotel bar. Usually the lines are not so thick.  Still, so easy to remove, and much easier to see on this fabric than anything else I have, including the frixion pens.  The ball point pins up in the corner were just waiting to go into a drawer for a knit sewing day, I have only sharp pins in the pin cushion.

I had to break on the periwinkle quilt a little as I ran out of  the pool green background fabric.  I ordered more and it's been washed and is ready for iron and starch.  I've just bought a June Taylor "special shapes" ruler and I'm looking forward to seeing if it makes cutting strips as painless as they made it look.  No picture of that, if you wonder what I'm talking about there you can google it (or you tube, they have a lovely video that was probably the hook that got me) or come back here in a week or so to see if I wrote an exciting review on THAT.

No sewing of Christmas Jammies this year.  Let them learn to sew if they want them! I would be happy to give lessons.  Actually, I'd love to teach beginner sewing.  One day, maybe.

What's on my audio books this week? The Filter Bubble, Eli Pariser- good non fiction about the personalization of your news (and pretty much everything) feed by Google and Facebook, I'm sure you tube is on the list or should be.  And, Spring Chicken, Bill Gifford- another non fiction about anti aging I think.  I haven't delved into it yet.  Not as good as Rick Bragg's stories of the south that I just finished, but some interesting fodder.

Sunday, November 8, 2015

Return to the periwinkle

I don't know what makes me keep slogging away at this one.  Probably because I have the ruler and 10 lbs (ok, exaggerating here) of the papers. 

Doing this block the Missouri Star Quilt Company way left my points all cockeyed, but trying to do it the traditional paper-pieced way was if-y, as that middle diamond is cut precisely to size.  I worked it out so I can get results I can live with.


I do use the tool to mark the diamond center of the block.  The inside lines are the seam lines, I can't draw those without drawing the outside lines.  If I could, I'd probably skip those outside lines.  No, I will not make a second template.

 
I start all the blocks at the right side, marked side of paper toward me, fabric RIGHT SIDES TOGETHER.  See what I mean about that outside line?  On this part, the seam allowance is extending to the other side, the inside, of the seam line. A scant 1/4 inch.  That diamond, once sewn, should fold back perfectly into the diamond space with the RIGHT SIDE proudly up on the non-drawn side of the paper.
 
That little shave of paper visible from the back is about all I would tolerate.  Any more, I'd rip stitches and resew.  I did on more than a few blocks.
These can be chain pieced even though you are stopping at that apex of the v.  I just stop after one, pull the thread enough to be able to pull the fabric to the v, drop my needle down and then put the feet back down.  I only pull the thread the minimal distance needed and don't cut.  You can't keep sewing from one to the next without sewing in that seam allowance you want free of stitching, so in the strictest sense it isn't chaining.  But it saves you snip, snip, snip and stopping to throw away your threads, so it is, too! 
After you've pressed open and satisfied yourself with your diamonds, flip it back over to put on the other background piece.  This time I'm holding it upside down so my work area is still to the right, because my brain just works like that. It is still RIGHT SIDES TOGETHER but this time the seam allowance will be in the extra drawn space. This is because we aren't pressing towards the dark, but all to the left, or counter-clock wise. 
 

Again with the kinda sorta chain piece technique. And stay out of those seam allowances. And no, this thousand pound machine has never crashed through this top.  It only appears to be that precarious.
 
Press it open.  It looks like this.
Trim fabric even with the paper.  See how little of the diamond fabric is wasted?  See HOW MUCH of that solid is?   I'm saving the bigger wedges, but I don't know if I'll ever use them.  I do hate to throw them away though.  See that little cutting square of board?  It was cut from a warped/burned/damaged somehow board, at least as long ago as the 90's.  I like it for little piecework  even better than the yellow turning one I have below it.  The turning one has to be in the right spot so nothing stops it's square shape from spinning, but my loose one gets picked up and moved with everything staying just so on it's surface.
 
The seam allowances should nest divinely.  Keep the paper on them to help manage those bias edges and chain or pseudo chain, whatever.
 
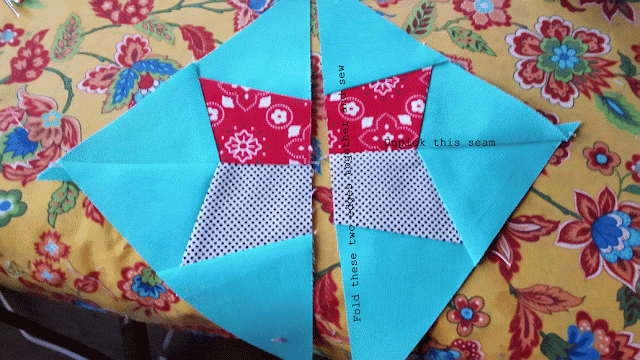
If you get this, there are some that will say you did something wrong.  I won't judge you.  You may choose to unpick one unit and sew different edges together, so the colors/patterns touching on the inside alternate.  Or keep it this way if you want. 
 You can avoid this scenario by keeping your units the same as you feed them through.  Either red or black on top, but not both.  Feed in the same direction through the machine.
 If you do have stitches in your seam allowances, you can unpick just those couple stitches to be able to do the spin thing, reducing bulk.  One or two or three stitches are easy enough to unpick, and I love how well bulk is distributed with the spin. 
 The back.
The front. 
 
I'm making a baby quilt.  Which means before I even get what I'll consider consistently adequate, I'll be done.  That's ok, cause that's when I get to quilt, which is the happy part of quilt making for me.


Friday, October 30, 2015

Sad


I lost my eldest brother last week.  I haven't known how (or whether) to write about it, kind of like how or whether to talk about it.  He was sick as hell from terminal lung cancer, but what ended his life was a wacked out girlfriend with a poorly planned premeditated murder. 

I worked for at least 12 years, coming and going, coming back, as a prison nurse.  It was my favorite job.  I've known many murderers and heard many stories.  A big part of me wants to, and does, look at this from the perspective of clinically seasoned prison/psych nurse.  Then it sneaks from around the corner and slaps me as sister.

I wasn't going to go home, I haven't been in more than 10 years, and only a grand total of 4 times since I joined the Army back in 1982.  Military brats that grow up and join the military, many of us don't go back.  I did go home though, in the company of my middle brother.  We spent two days and nights with his daughter and her family in a wonderful condo on Panama City Beach.  There was red tide going on and rip tide warnings my entire time there (like every one of the times I've been back to visit!) but still, seeing that magnificent Gulf Coast was so soothing.


I live 12 miles from a Delaware beach, but it's not the same as the Gulf of Mexico.  I am still vacillating between grief, anger, and detached analytics.  Now I feel a little homesick too.  Home, back here, seems a little dimmer right now.

Saturday, October 17, 2015

Mini periwinkle quilt misery


is what I was ending up with using this template and a kind of pseudo paper piecing technique with the tutorial.  I even went back and traced around the template on the back, then added correct seam allowances so I would have more accuracy.

                        
It just didn't add up to enough improvement to warrant the additional work.  There is a lovely tutorial by Red Pepper Quilts for the same quilt, using her foundation paper. Unfortunately, it is a slightly different size so I would have to print out and then CUT out all those patterns.  While I was looking at her tutorial again just now, I'm thinking if I followed along her directions to the letter I might get the results I am craving.  I do have about a gazillion of those MSQC triangle papers.  She puts down triangle, diamond, triangle and then presses all in one direction.  MSQC puts the diamond down first, assisted with a smear of glue stick, then left triangle and  right triangle.  Might be less bulk at the kissing diamond points the Red Pepper way.  I'll give it one more shot, darn it! 

*Update, Saturday night shift- Oh, dear.  I'm supposed to be sewing 4 of these pieced triangles together, not two.  Might make a BIG difference.  I'll definitely give it another shot!  I'm still going to incorporate Red Pepper's directions so I can twirl the center intersecting seams on the back.  I love doing that.  The thrill may wear off before these (half gazillion) triangles get made into a quilt. 


I got the 15-91 installed into the cabinet and oiled and the bobbin case arrived.  I tossed an orphan block into a small sandwich and tried out some free motion quilting.  I know every machine feels a little different but this did feel exceptionally "draggy".  The feed dogs do drop, but it felt like they were still influencing the flow.  I took a look at them in action- they appear possibly higher than they should be, and with the sandwich squished down they may be grabbed intermittently by feed dog movement.  I put stitch length at zero and that helped. I decided to give my supreme slider teflon sheet a shot.  This was the first machine of three that I really felt a benefit with it on, but alas!


That gold speckle upper right is some of my antique finish.  It did this on the Singer 201-2 as well. I won't try it again on another black vintage singer. It may do better on the later model machines.  I don't foresee myself getting any of those.  I have a taupe Kenmore from the 60's that suffered no ill effects from the slider, but it was one of the machines that didn't really have an improvement either.  It already did sweet free motion.

The 15-91 is also NOISIER than the 201.  It has a smaller (though still large) harp space.  It does move to the right smoother in free motion than the 201, but I think I've already learned to compensate for this.  I still want to try out free motion embroidery, and specifically free motion embroidery without any foot.  I think this machine will do better at that job than any machine I've ever owned or played on. One day, I'd like to be, in my own style, as good as this guy.

Monday, October 12, 2015

It didn't follow me home


I emailed the seller over two nights about it and got up today after 4 hours of sleep to go get it.  I removed it from the cabinet for transport and didn't put it back in yet.  I know it's kind of nutty- this makes 4 machines in cabinets, total of 6 in my bedroom.  I have one more on the stair landing that is waiting for a 306k stitch regulator (if someone just happens by here and has a parts machine :)).   I spotted this while looking for a machine for someone else and they didn't want it. It kept calling me back to the page.

This is a  Singer 15-91, the "farmer's wife" and very similar to my 201-2 "dressmaker".  I have been loving that 201, the machine that started me on this SMAD thing, BUT!  Reading and reading and reading about these vintage machines had the opinions of several owners saying that the 91 does better free motion because of the oscillating bobbin.  The 201 is considered to be more "deluxe" and has a drop in.  I have free motioned very successfully and enjoyably on the 201, but I have not had good results trying free motion embroidery or thread painting on it.  While hand zigging a hoop under a needle without a foot, it consistently skips stitches as I zig to the left and does better when I zag to the right. Here's a video of some nice technique if you are unfamiliar with this particular skill.  Mostly, it just boils down to I wanted one of these.

So, I've been hankering for one of these for quite some time, and this one came along looking very shiny, in a nice cabinet with "attachments" and the original manual, for a fair price of $75.  It does have the bobbin cover slide plate, the bobbin case is sadly missing.  I've already ordered it and some extra bobbins.  I powered her up and she sounds powerful, clean, quiet and very well machined.  I saw no evidence of wiring decay and it looks like it was regularly serviced.  I got to meet the 96 year old original owner.  She told me she purchased it during WWII and had to pre-order and wait for it to become available, metal rationing.  Nice lady and nice family, and I think they were pleased that I seemed very competent with the machine and intended to use it.

I'm not buying ANYMORE unless it is cheaper than $15.00 or is an excellent treadle in an excellent base.  There is, after all, more fabric to acquire.

Sunday, October 4, 2015

A singer 201-2

is a fine machine however, $25,000.00 is a steep price to pay.  Craigslist in Delaware, keeps my herd from growing too quickly.  I'm hoping this price is a typo, but most machines offered there are overpriced, some figure out of a non-sewing (or dusting, never mind tuning up) owner's head.


WELL.  Getting that photo to upload just took about 3 hours over 2 nights.  Until I finally thought to switch from edge to chrome.  Then, pow, thank you again Google!  The block itself, a free 12 inch finished twinkling star was warned to be "a bit challenging" and it was, but I was fairly pleased with the results.  I took my time, which ended up being about a week, and didn't feel bad at all about it.  It's not at all approaching perfection, but it's pleasing and finished. Win Win.

I pieced the block, and have done some mending on my own ''rare and one of a kind" 201.  Mine was supposed to be $20, but the owner ended up just giving it to me.  I had to rewire before it would run, scary but fun and addictive.


Of course it is not treadled, even though it's perched precariously on a treadle cabinet.  I just liked this gifted cabinet so much that I decided to put it to use.  I guess the machine could just fall through to the floor at anytime, it is not screwed in and the top has some splitting wood. I've been using it there for at least a year now and it hasn't even looked like it wants to fall.  I don't want to modify this cabinet in case the right machine comes along for it that CAN be treadled.  The insert area is actually for a 3/4 machine, and not a Singer brand.  I figure that smaller hole is the reason the 201 hasn't landed it's 40 or whatever pounds on my happily sewing feet. I've always liked to live a little dangerously, and now that I'm an old lady night shift worker I have to skirt danger where I can.  

UPDATE 10/25/15  That 201 above is marked down!  To $40.00!  Quite a reduction, I must say.  If it were closer to me.....