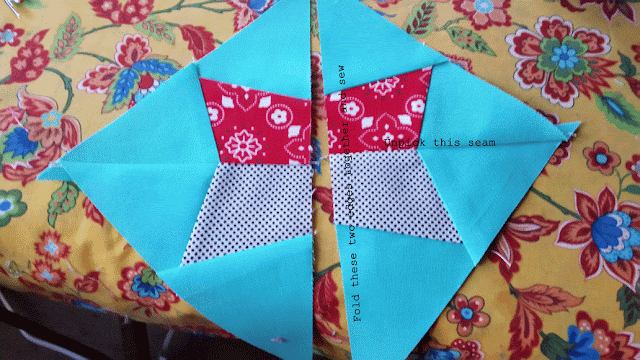
Doing this block the Missouri Star Quilt Company way left my points all cockeyed, but trying to do it the traditional paper-pieced way was if-y, as that middle diamond is cut precisely to size. I worked it out so I can get results I can live with.
I do use the tool to mark the diamond center of the block. The inside lines are the seam lines, I can't draw those without drawing the outside lines. If I could, I'd probably skip those outside lines. No, I will not make a second template.
I start all the blocks at the right side, marked side of paper toward me, fabric RIGHT SIDES TOGETHER. See what I mean about that outside line? On this part, the seam allowance is extending to the other side, the inside, of the seam line. A scant 1/4 inch. That diamond, once sewn, should fold back perfectly into the diamond space with the RIGHT SIDE proudly up on the non-drawn side of the paper.
That little shave of paper visible from the back is about all I would tolerate. Any more, I'd rip stitches and resew. I did on more than a few blocks.
These can be chain pieced even though you are stopping at that apex of the v. I just stop after one, pull the thread enough to be able to pull the fabric to the v, drop my needle down and then put the feet back down. I only pull the thread the minimal distance needed and don't cut. You can't keep sewing from one to the next without sewing in that seam allowance you want free of stitching, so in the strictest sense it isn't chaining. But it saves you snip, snip, snip and stopping to throw away your threads, so it is, too!
After you've pressed open and satisfied yourself with your diamonds, flip it back over to put on the other background piece. This time I'm holding it upside down so my work area is still to the right, because my brain just works like that. It is still RIGHT SIDES TOGETHER but this time the seam allowance will be in the extra drawn space. This is because we aren't pressing towards the dark, but all to the left, or counter-clock wise.
Again with the kinda sorta chain piece technique. And stay out of those seam allowances. And no, this thousand pound machine has never crashed through this top. It only appears to be that precarious.
Press it open. It looks like this.
Trim fabric even with the paper. See how little of the diamond fabric is wasted? See HOW MUCH of that solid is? I'm saving the bigger wedges, but I don't know if I'll ever use them. I do hate to throw them away though. See that little cutting square of board? It was cut from a warped/burned/damaged somehow board, at least as long ago as the 90's. I like it for little piecework even better than the yellow turning one I have below it. The turning one has to be in the right spot so nothing stops it's square shape from spinning, but my loose one gets picked up and moved with everything staying just so on it's surface.
The seam allowances should nest divinely. Keep the paper on them to help manage those bias edges and chain or pseudo chain, whatever.
If you get this, there are some that will say you did something wrong. I won't judge you. You may choose to unpick one unit and sew different edges together, so the colors/patterns touching on the inside alternate. Or keep it this way if you want.
You can avoid this scenario by keeping your units the same as you feed them through. Either red or black on top, but not both. Feed in the same direction through the machine.
If you do have stitches in your seam allowances, you can unpick just those couple stitches to be able to do the spin thing, reducing bulk. One or two or three stitches are easy enough to unpick, and I love how well bulk is distributed with the spin.
The back.
The front.
I'm making a baby quilt. Which means before I even get what I'll consider consistently adequate, I'll be done. That's ok, cause that's when I get to quilt, which is the happy part of quilt making for me.


No comments:
Post a Comment