Friday, November 7, 2014

Sewing plenty


At least, much more than my norm.  I got my pants sloper done.  That's it below the envelope, with painter's tape to white paper, spreading it out.  It actually needed much less adjustment than I thought.  After I had a significant crotch depth increase done, the rest of the proportions fit better than my measuring tape led me to believe,  I went ahead and used the sloper to modify my butterick jeans pattern and I wish I would have made a sloper back in 8th grade home ec.  That teacher just did not have aspirations for any of us that high.  We were an ill mannered rotten bunch, as I recall.


ANYWAY, other progress as promised are the machines I had sitting and waiting for rebirth.  Complete success with the 401a, so I rewarded myself by buying some new feet and thread spindles for her.  This is a slant shank machine, I can't use my low shanks that have worked well for all of my other Kenmore and Singer models.  I believe the presser foot height is still not correct.  I had to switch back to my Kenmore for sewing over thick seams on my jean shorts.  The older 306k though.....I had gone ahead and purchased a new bobbin case and the special needles it takes, all excited because I knew I was going to love this machine.  BUT, when I oiled her up and started wiggling her stuck stuff, snap!  The darn stitch regulator lever that controls stitch length and direction just snapped off.  Everything else is pretty groovy, I can see very beautiful fine stitches, I just can't have any other size or go backwards unless I get a new regulator, and get it correctly inserted up in there.


As far as quilting goes, the sampler is on a serious stall.  I hope I live long enough to see it done.  I totally gave up the mini quilt idea after sewing one eighth of the first mini block.  I have discovered the therapeutic claims of paper pieced hand sewn hexi blocks are true and I am amassing quite a pile.  I plan on using them to applique onto a duvet cover.  One scrap per flower, none used twice.  I may use up all those singles as the centers, or in another project entirely.

 
I did a quick muslin of the jean pattern just to check out the yoke and waistband part of the jean.  Satisfied, I pulled out my denim to find the stash I've had more than a decade was only a yard or so.  I decided making shorts would be good practice sewing with heavy fabrics and topstitching thread.  Turns out I needed the practice.  I also learned I need more than a 5/8 seam to do a better flat-fell seam too.  It just doesn't look right that narrow.  I've picked more seams out from these "practice shorts" than I probably ever have on any other project.  I guess I'd throw out anything that required that much work for real.  Also frustrating is trying to find the right denim.  I've purchased unsatisfactory stuff from Joann's and Mode.  I'm aware of Taylor's selvedge denim and I bought hardware and thread from him, but I don't want high priced narrow-width denim- it just feels a little pretentious and wasteful for where my jean sewing level is.  I do want old fashioned, stiff, heavy, thick, non stretchy dungaree style denim.  I think I've found a source in NYC after calling a manufacturer in TX and begging the lady who answered the phone for a lead on one of their customers that might sell yardage.  60" wide, 14 oz good stuff.  If it goes through, I'll post it when ever I can.  I'm seriously thinking of buying a damn roll and selling it myself!!!
 
 
It's almost jammie sewing time again.  I've been accumulating flannel.  I really hope I find some denim and sew my jeans before Christmas!


Monday, September 8, 2014

too busy for photos

but I've been on those machines, yes I have.  I've sewed a bunch of button up shirts for my grandson who was undergoing his first surgery for cleft palate and needed shirts that didn't pull over his head.  I've done some more blocks on a sampler quilt that I've been plugging away at for more than half a year, and I'm beginning to see light at the end of that tunnel!  I started a miniature quilt that was actually supposed to be all hand stitched, but I'm thinking now maybe one block hand, 5 blocks(maybe paper pieced) by machine?  The idea was to do it at nightshift, but most of my jobs are too dark for sewing.  Well.  I also got onto photoshop elements and have been working out how to get correctly sized templates to be ready for printing onto freezer paper, and how to design quilts using that program.  If I get good at it, maybe I'll do a tutorial for that.

I'm zig zagging between garments and quilts, and well aware I sew nothing for myself.  Today I started the long, long, long awaited pants sloper, with a bodice/dress sloper waiting just behind.  I have only got to the major adjustments and it is so plain to me- this is why my sewing garments for myself was so hit and miss, and this is why I didn't sew for myself.  Good grief!!! 9 inches for height, 2 inches of that in crotch depth.  I've never had a waist, 5 inches adjustment for that.  Holy smoke.  If I get any kind of decent sloper at all, pants will be fabulous!!!  Then I think about the agony of shopping RTW and that will be in the past as well.  I can hunt hard and usually find acceptable jeans, but dress pants have never ever ever felt good.  I'm hopeful!  I've just ordered gingham online for the two slopers, I was tired of fiddling with them today anyway.  I started thinking about sewing jeans, but dress pants that might feel good?  Wow.

So, yeah, I could post some pics of the teensy quilt pieces (less than an inch square is pretty teensy) or the REALLY cute shirts or even my chopped and taped start of a sloper but the creativity only goes so far on a day when I had to mow the whole overgrown and damp yard.  It's pouring now, I'm so glad I did.  Now I have to cook or get in the car for take out....where's my keys.  Pics next time, maybe.

Sunday, August 10, 2014

Whoops, missed July!

I was sewing- matter of fact, I did a video showing the use of the binder foot for this grand-daughter outfit.
 
It is almost to sicky sweet for me to stomach, though it's a little better with the shorts just barely peeping out.  Also, I caught the darn thing on fire from a fragrance candle as I was sewing and had to re-cut the front from the last little piece of fabric....whoops, upside down.  I realized this was a directional print the first time cutting out but forgot in my frustration the second time.  The pockets were from virtually the only tute out there for pleated pockets, Made by Rae.  Thanks, Rae, for not making me trial and error!  Mostly I had lots of fun with using my vintage singer binding foot to finish the inside seams.  It was a good refresher in making binding (continuous and not) and applying (with the foot and not).  I also found the foot works great on my Kenmore 90.  I thought, being low shank, that it would and it did not disappoint.
 
 
I never posted the video either, I think there were some points I left out and I intended to re-shoot or something.  I can't remember.  Can I blame it all on night shift?  I think I CAN!
 
I splurged and purchased the long contemplated quilting notions of the quilting Halo (a weighted, rubberized ring to place on top of a quilt being stitched on a domestic machine) and a supreme slider (a Teflon sheet with a hole in the center to go over your machine and under the quilt, the little hole for the needle).  Both are kind of pricey for what my mind tells me they are.  Both have high praise for years from many quilters.  I tried them on both the Singer 201 and the Kenmore 90 and was not sent to the moon- no marked difference on either machine.  I was only playing on roughly 10 or 12 inch squares and only for an hour or two.  Maybe I'd feel a real difference with a quilt that had real heft to it- both are designed with the intention of moving a quilt more smoothly with less hand/body strain in domestic quilting.
 
I didn't play long because youngest daughter drops in to mention that my youngest grandson needs shirts that open and fasten for his recovery from surgery- with 4 days notice.  He has cleft palate and is getting his wee little lip sewed up, they don't want shirts being pulled over his head (Nurse headsmacks self here, duh!  But honestly I don't try and be nurse and grandmom at the same time).  So quilting supplies put back away!  Pinterest and internet scouring for little boy appropriate post op clothes, and yay!  I'll get to practice putting on more binding!


More HOMEMADE binding, because I'm just totally digging "fancy" binding as a design element in clothes.  I remember making about 1000 yards to go on a sundress for me back in the 80's and not being one little bit impressed.

 
I think that plaid on the bias is going to look great encasing the edges of this kimono onsie I found that has sizes for 3,6, and 12 months.  And yes, ma'am, that fabric grain is straight and the print is NOT directional.
 
I also plan to do one or two short sleeve versions of the easter shirt I did for the bambino this past spring.  Then, gasp, some clothing FOR MYSELF.  And try to get the quilting progressing.  That sampler quilt is a slow growing animal.  All my quilt tops take forever.
 
Awful silent about that vintage 401A, aren't I?  It's still got the original dust on it.  But I haven't forgotten it.  The lawn mower is a big time sucker in the summer, and I have to go to the beach SOMETIMES, I have the Atlantic Ocean 12 miles away!

Sunday, June 1, 2014

sewing standstill

going on since I bought the lawn mower.  Go figure.  I've been puttering in the garden and trimming trees and bushes and mowing when I'm not asleep or taking care of grands and adult children.  I cast a doleful eye over to the sewing table from time to time, but I haven't managed to clean the entire room in a month, much less arrange my hair and put on lipstick to sew.  If you haven't read that advice from the 50's then you missed it, but I do need to feel like stuff is done before I enjoy sewing.

I DID, however. feed my sewing machine acquisition disorder with two new vintage machines this week.  Here they are in their dirt-encrusted non working glory:


This is a singer 306k, from the 50's.  So far I can barely get the wheel to turn with my hand and so can't see how it will stitch.  It takes special needles, and I broke the bobbin case.  The motor whines but doesn't move anything.  I'm thinking this was Singer's first zigzag.  I think it's kind of cute, but it's on the back burner after this one:
 
.


This is a Singer 401A, and it does straight stitch with a sluggish motor action (shovel out a few decades of dirt and lubricate well and it should be much more lively).  This was another of Singer top of the line machines and I've been reading lots of good things about it.  I've been wiggling and coaxing the zig zag function but it still hasn't come quite to life yet.  It also has quite a few decorative stitches built in.  Dual needle capable, meaning you can buy a double needle or just insert 2 regular needles into the holder and sew.  I don't think it will steal my heart completely from my 201-2, but I'm excited to see the old timey decorative stitches. 
 
 
As I'm writing I'm believing I'm working my last night shift before 3 nights off.  I won't look at my schedule until Monday afternoon to keep living the dream anyway.  I'm hoping to at least clean the 401 thoroughly and figure out if that will bring back the zig-zag or find if I have a broken spring or something in the head.  I don't have a slant shank foot, so I'll still have to order one before I can really sew.  All these parts are amazingly cheap and easy to find online.  And not to difficult to repair yourself!  These two make numbers 5 and 6 of machines I have acquired that didn't work, and I have successfully restored 4 to good working order.


Monday, May 5, 2014

Baby Boy Easter Suit

 
McCall's M6873 to be specific.  I currently have two infant boys in my house and got suckered with some Easter fever and decided to sew this.  The pattern has an "easy" description that I would have to disagree with.  I only got one done before Easter and still have one to do, so I thought I might as well do it online as a semi/pseudo tutorial for prosperity.

Nothing in the construction of these pieces was surprising or horribly complicated.  I've probably sewn more than 100 pairs of pants, a good 50 or more button down shirts and at least 10 lined vests in my time.  Except for pants, it's been a good 15 years since I've been garment sewing, so I was rusty but still fairly competent.  I had some issues with some of the written instructions.  I've decided to be the back up chorus this pattern needs to nudge it a little more firmly into the "Easy" zone.


One thing that I found kind of surprising are the lack of reminders to finish seams and press open as you go.  I know this wasn't a "learning to sew" or "beginner's" pattern, but I still think a nudge to such things is in order.  Be aware that you need to take care of those details as you sew, without them being mentioned in the by-the-number instructions.  Your suit will suffer significantly without getting those seams pressed open.  I very much love my sleeve board for kid's clothes seams.


An unfinished wooden dowel can be very useful for sticking in those skinny leg or arms to get a seam pressed.  I use a miniature cutting board as a clapper, to "clap" down on seams after pressing with steam.  It gives a crisp and long lasting press with very little time or effort.  Any small unfinished piece of wood would do.  Notice the seam edges fraying to beat the band there!  Left unfinished they would ravel up to the stitching after some laundering, and look really ugly too.  You can finish those fabric edges before sewing or after.  Serge or zigzag or use pinking shears, but finish those suckers!  And do it as you go, please.


I started with pants, the easiest and probably most familiar of the garments.  They are easy. The only other things I can think of to add to the pants portion is:
 
  MARK them.  Those notches are important.  I clip in rather than notch out to save time. Marking them either in or out will prevent you sewing in a piece upside down or backwards, or sewing a front to a front instead of a back.  If the notches don't match up, step back and figure out why. Sometimes I skip marking circles and dots if I can gestimate or lay the paper pattern on top later for say a pocket placement.  I almost never mark fold or hemlines for the same reason.
 
  NOTCHES disappear after you trim or finish a seam.  Frequently they are the best way to tell front from back on a garment because the front pieces may have two notches and backs have three .  I stick a safety pin in the waistband area as soon as I'm ready to finish those notched seams so I can identify the back later without having to evaluate the crotch, which has room for a bottom in the back and is flatter in the front if you really look at it.  I also mark kids' (or any elasticized) pants by sewing a little ribbon in the back under the waistband casing so everyone can tell when it's time to put them on.

  CUFF CONSTRUCTION on this pattern confused me a little bit when they used the term "roll line" for the fold that you make turning fabric inside to get the total length before folding up again for the cuff.  I would have just called that fold the hemline.  I had to look carefully at the diagram and the pattern to figure out what they wanted me to do.  Roll line more usually refers to a soft fold such as on a jacket lapel.  I would have used roll line to refer to the fold back out to make the cuff if I had to use it at all.  Probably I'd stick to hemline and fold line.  It just irritated me. It could have been a night shift person coping with daylight moment.

Other than those few ticklers, the pants were easy indeed.  If you've sewn anything from a "learn to sew" commercial pattern before, you could pull off these pants.  The vest, tie, and "square" were very simple and I'll do a little ditty on them one day soon.  The shirt is where I think the design wasn't made as easy as it could be and the directions were worse.  It has the potential to ruin lots of little yardages of fabric and discourage budding sewests all across the nation.  It's not a BAD pattern, it just could have been much simpler to be sold as easy. Hopefully, a real tutorial will help someone out.

The outfit at completion really was cute and gratifying, totally worth the effort.  Sewing baby and kid clothes is a great place to gain skills because it doesn't involve big investments in fabric. 

magic method my- foot!


ha ha ha, I mean whoops.  Not only did I not realize that I never published this, it's possible that I never wrote it!!!!  I swear I thought I did.  I'm POSITIVE that I took pictures for it.

Blaming it on night shift.  Night shift is one area in my life that I could change and have immediate, long lasting, and dramatic benefits if I'd just go get a day or evening job.  However, I'd probably have to get out of bed.   And put on clothes AND makeup.  There's only a few nursing jobs out there that could really make me want to go to all that trouble.  But night shift sucks the life out of me.

Anyway, I was working on the sampler quilt, and trying out a flying geese "magic method".  It frustrated the heck out of me.  I was determined to get it right and be happy like all of the other commenters on the tutorial.  There was only one failure and her name creeped me out and I didn't want to be on her team.  So I repeated and repeated.  I kept ending up with a block smaller than it should be.  Now I'm wondering if blasting with steam and starch shrank that not preshrunk cotton up that much, and suspect it did.  THAT'S why for garment sewing, you always preshrink.  Seems to me that sewing quilts is much more work and should all be preshrunk too, though I know the majority is not for preshrinking.  But how the heck would you preshrink precuts like jelly rolls and charm packs?  You sure couldn't get them back into their pre-treated form.

So I actually came on blogger tonight to edit and post the next post, because this one was done months ago.  Sigh, night shift.  I'll see if I can dig out a photo or two before I go on.... No. No pics.  I did get Godzilla running better, though she'll never replace that 201-2!

Saturday, March 15, 2014

Momma said

there'd be days like this, the song says.  And it's been one of those days!  I jumped back on the Singer 128 and fiddled and fiddled and fiddled with that tension but just couldn't get it right.  I saw on someone's tutorial that the spring should be sticking out at about 930 position, but mine just would not bounce or spring that low, it wants to be at midnight.  It will not put correct tension on the top thread at midnight though.  Back at 930, and it lays like a dead fish, also not providing the correct tension.  I could see such promise of wonderful stitches from the backside of the fabric.  I kept running samples while adjusting the dial hopefully until I noticed sparking and smoking from the motor.  I put her Godzilla butt away for the evening, and turned to the quilt block I am working on.


Sometimes I dream that I did things I did not, but I'm pretty sure I blogged about these magic flying geese last night.  How I didn't really catch on how to square them up right until after messing up set one and maybe some of set two.  Putting one of set one and one of set two together was going to be a little tricky as you can see from the photo above.  I have been puzzling in my head how best to get these conflicting sized units to come together.  AHA!


Freezer paper templates, cut to the size of the finished unit!  I figured this way I wouldn't be guessing when to add or take away from the quarter inch allowance.


Then, inspired by SharonSchamber excellence and techniques, I pinned so that the two pieces met at the corners of the templates and used school glue to baste in place before stitching.


A teensy thin line of glue is recommended, and heat set it with an iron please.  Should I apologize for the blurry photo here?  Or the chipped polish on just the thumbnail?  I don't think so.  Plenty of blurry and chipped going on in my life- if it's not in yours feel free to feel smug here.  I don't mind, really!


I carefully stitch just outside the template, except that bulky point makes me swerve a little.  S'OK.


TA DA!  Open and pressed out and oh, my goodness.  The darn bases.  Will have the points cut off as soon as I attach them to anything. Also, the side unit is not the same size as the flying geese unit.  The whole funky thing is going in the shoe box of bastard quilt units, to be used as whatever until one day maybe I'll make some piece-y animal softies or something out of them.  Momma also used to say, try again.  This magic method is getting one more shot, just because I'm mad at it for wasting so much time and fabric already.  Next time I'm using pretty fabric too, Nyah!

Thursday, March 13, 2014

Creatively chugging

along..... Let's see.  I've made two pair of kid pants without a pattern.  It looks so easy, heck it kind of is easy, but I still managed to majorly screw up.  I don't know how I got the but/belly area so much smaller than needed, but I did.  Having made Rae's big butt baby pants in the past, I figured out a gusset for both the front and the back and saved the britches.  This would only work for a toddler who can't complain about the obvious weirdness, but who else would wear tinkerbell fabric in the daytime.  OK, probably there are grownups that would, probably not with the gusset.  Both cousins got a pair, one without the gusset after I paid more attention making the second pair.  Lined, trimmed in rick rack, and made on the 201 with the zigzag attachment to finish seams.


I also made a pair of chef pants for my adult son, and I whipped up two carry on bags for me and my friend. I learned fairly last minute that the airline had specifications for carry on that would cost me quite a bit to take the little wheeled case I already had.  So the day of departure I made two bags to exact specs they posted.  I don't have a picture of them, they aren't the prettiest, best made bags ever, but they did the job.  It whet my taste for bag making, and I've been musing about bags for some time now.  I'll have to try again soon.
 
The sewing that has been consistently engaging me is the sampler quilt I've been working on for maybe 3 months now.  It was a sew along a couple of years ago, I've been sewing it alone.  I'm surprised at how long its been taking me and that I've stuck with it.  I've only got 6 blocks done, if  you count the rejects I've done 9.  One was rejected because of obvious polyester that snuck in while the rest of the quilt is cotton.  One had funky points that will be square edged if it's ever sewed to anything else. I think the third came up just too small.  The rejects are in the top row.
 

The current block I'm working on is "Flying Geese, magic method".  I was kind of peeved with the magic method, which caused all my geese units to be a little bent or bowed.
 
It took me a couple units to figure out how to trim them correctly, so I don't know if this block will make the grade either.
 
Those diagonal markings are your friend.  I was trying to line up with the straight lines of length or width and that wasn't working.  The 45 degree angle made it right.
 
I found another vintage machine to work on.  This was in a local antique/pawn shop marked $50. and purchased for $20, with a box of attachments (alas for a slant needle, which this is not) thrown in.


Straight from the store it only hummed a little when plugged in, but the hand wheel turned freely and the needle went up and down.  Above it has had a minor cleaning and oiling and now runs pretty nicely.  I needed to screw the ancient light bulb back in and it's fine.  The bobbin is one of those freaky vibrating ones, looks like a screw and then gets dropped into a bullet looking thing.  My bullet thing is too rusty to try out yet and is sitting in a dish of PB Blast now.  Maybe I'll do a whole post on this machine later, maybe not.  Truth, I was thinking it might be a featherweight and I was getting a wonderful deal.  I don't know my vintage singers that well yet. This is a 3/4 size machine, but a whole different species of Singer.  I'm thinking puritans sewed with this moma.  This was manufactured in 1951 without a normal looking bobbin!!!!  There is no backstitch.  It clatters compared to my quiet 201.  I need to reserve final judgments until I see some stitches. 

Like the fish fabric in the background?  From the antique store a couple feet away.  I think my Momma had a church dress made out of this fabric in 1969.  Or maybe it was my dress.

Sunday, January 19, 2014

My first sewing video


Is up on youtube, the adjustable hemmer foot.  We spent some quality time together, this foot and I, while getting ready and shooting the tutorial.  I'm almost convinced that with the low volume of fine heirloom sewing that I do it MIGHT be a waste of time to invest the hours it would take to become expert at the use of this foot. Then again, as fumbly as I am with it, I can look at a couple inches of success and see how marvelous it would be on some keepsake baby things, or any special thing. 

 
I can topstitch pretty well, but the way this foot gets right to the edge of the hem and then runs so perfectly distanced from the fold....it's just so darn FINE.  I don't know why this foot isn't made anymore.  I don't.  I'm still working on technique- it's not the easiest attachment I've ever used.I thought I'd give a little rundown on use here, for someone who may be searching but unable to view a streaming video.
 
This foot actually has a foot within the foot- there is a little scroll of a rolled hem foot at the end of this yellow arrowed metal piece in the photo here:
 
So, yes, this does take that hellish little foot up to another level.  In the video I said it wasn't an attachment for the faint of heart.  I was never a rolled hem ninja either, but I kept going with this sucker anyway.

 
For best results, a little prep helps. Use the iron and press over a very narrow hem, and then fold again, a less narrow one to enclose all raw edges.  The foot is designed to do 1/4 to maybe 2" hems, but I've been practicing on 1/2". You only need to prep/iron the first two inches or so, to help start it.


You then want to insert it under the pressor foot. Take 2 or 3 stitches to anchor the beginning of the hem, then lift the foot (I have the needle up too, so I can really move the fabric around) and manipulate the fabric between those two yellow arrows pictured above. 
 
 
After you've worked it into this area between the arrows, aim for getting it to flip into the scroll of that little rolled foot closer to the needle as well.  Start off sewing slowly, and watch that needle to ensure it's piercing through the fold and not beside it.
 
There is one other video other than mine on youtube, and she wasn't much better skilled at this foot than I am.  I think I'll keep it out and keep working on it, and post an update.  I wonder how many people still have mad skills with it. I want to be one! 


Friday, January 10, 2014

Plodding along, and new toys!

MMMM. Espresso and snow and sewing.  The syringe is how I oil this oil hungry machine.

 
I am still working on my sampler quilt from the sewn by Leila blog.  I think  block number 5 is pretty darn good for me.  I like that it's something different every block.  Although it does feel like a heck of a lot of half square triangles.  How come I'm not a master yet????


Well, shoot, I haven't mastered this blogger thing yet either.  It WILL NOT align on the right for me now.  Anyway, by the time I got as far as pictured above, I had a pretty firm suspicion that the minty fabric was a poly blend.  Darnit.  Bought it at Joanne's to back some quilt sometime so I have a fairly large chunk of yardage  I thought I had 100% cotton. As soon as I started pressing, it was obvious that I was using a blend.  It kept melting on the cotton setting.


I kind of doubt it will make it into the final quilt, but I really like the block  Maybe it will find it's way into something else of use.  Those corners still need work anyway  The Arizona block will be done over. I can stand one more time around.
 
OK, toys!  I purchased a zigzagger and a "box of accessories" for the Singer 201.  It took a little while to figure some of them out, most specifically this one:
 
..
Turns out this is an adjustable hemmer.  It keeps a precise fold in fabric for a nice hemline.  Not a great thriller, though I can see where it might be helpful with a fussy fabric or something.
 
 
I was very thrilled to see a ruffler.  It does tucks too.  Please keep in mind this was just sticking them on to see if I could make them function, without adjusting tension and working on the icky poly-blend fabric.


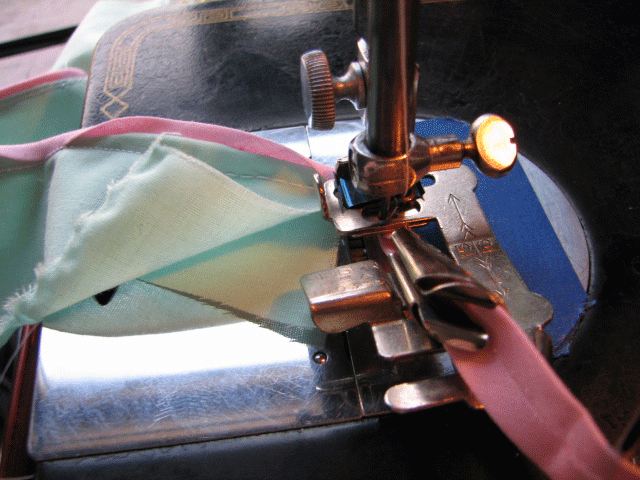
This one folds and applies binding in one step.  It does not work well with pre folded bias strips.  I didn't feel like cutting some bias to try it out, but I did a later run with this pink bias pressed open.  It worked pretty well.
 
 
I liked both of these very much.  In the back, a foot called a shirrer, because it shirrs fabric.  In front is an edging foot and it is handy.  It will keep two fabric pieces, or fabric and trim (or I guess 5 layers of things if you pushed it)slightly and consistently overlapped for very neat edgestitching.  The slot is nice for feeding a trim through for perfectly spaced decoration.  It's a low shank and will fit my vintage Kenmore too.  I think I'll use the heck out of this one.


The zigzagger, my primary reason for purchase, gave me fits at first.  After I found the little part that had snapped off and was under the cardboard packing in the box, I was satisfied with the result.  I can't believe I don't have a photo of the foot, but it's by Greist.  I've already stripped the screw that held on the cams for "decorative" stitches, but they weren't all that extraordinary anyway.  I do have specialty stitches on the Kenmore  model 90. And the zigzagger still zigzags, nicely. 
 
I had to play with tension as I progressed working with these feet, and it became apparent that I really needed to take the top tension down and apart.  I had been avoiding that part.  When I did, a big chunk of pencil lead fell out  Along with some fuzzies.  I cleaned it all out well and then it took 24 hours to figure out how to get it back together.  It's perfect now.  Made me feel good, since it was attempting to disassemble my top tension that caused me to kill the motherboard on my computerized Kenmore and started this whole vintage adventure  They didn't use to set you up for failure if you wanted to service your own machine.